Manage Years
The Chart of Accounts, the Budgets and Budget Projection amounts, and the Transactions you save and post to the accounts are kept track of in an Accounting Year that must be set up and managed from one year to the next. Anytime during your currently active Accounting Year, you can set up the new Accounting Year and begin working in it long before the current year is finished. You can then move back and forth between the years, continuing to record transactions in the current year while working to get the next year ready.
Under Special Functions in the Button Bar at the top of the screen, click the Manage Years button to reveal a list of options:
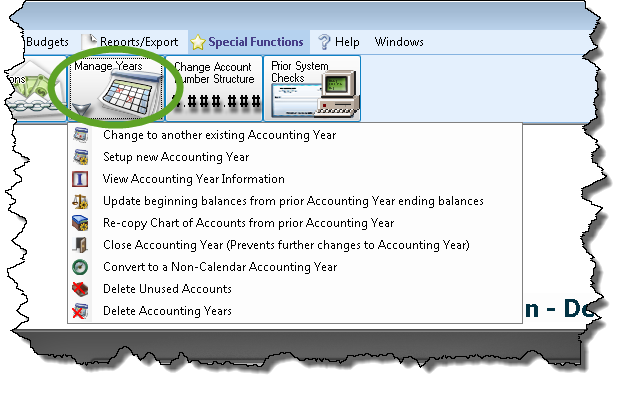
 Change to another existing Accounting Year
Choose Change to Another existing Accounting Year to open this screen.
- Click to Select an Accounting Year from the box.
- When clicked, the box will show you a list of Accounting Years and the following indications:
- Beg Bal Finalized: Indicates that the Accounting Year Beginning Balances have been finalized with a
 checkmark.
 - Closed: Indicates that the Close Accounting Year procedure has been completed.
- Select the desired Accounting Year and click the OK button.
Setup new Accounting Year
Choose Setup New Accounting Year to open this screen.
- Click the option to either Create Next Accounting Year, or Create Prior Accounting Year, according to the Accounting Year you plan to set up.
- Click the option to either Copy Chart of Accounts from [the previous Accounting Year period listed], or Create Empty Chart of Accounts.
- If you choose the option to Copy the Chart of Accounts, decide whether you wish the new year to have the same budget amounts from the Chart of Accounts being copied. If so, click the Copy Budgets box to place a checkmark .
OR
- If you choose the option to Create empty Chart of Accounts, decide on whether you wish to Use Account Numbers. If so, click the box to place a checkmark .
- Then, decide on the number structure you wish to use for your Chart of Accounts.
- Type the pound sign (#) to indicate a number placeholder and a period (.) to indicate a separator.
For example, ###.## indicates that you want your structure to have account numbers like 123.45 or 678.90.
- You can enter any combination of as many as 23 placeholders and periods, according to your desired number structure.
- If you choose the option to Copy the Chart of Accounts, decide whether you wish the new year to have the same budget amounts from the Chart of Accounts being copied. If so, click the Copy Budgets box to place a checkmark
- Click the OK button to proceed.
When the software finishes setting up the new year, the screen will return you to the main Accounting screen showing the Accounting Year you have just set up. If the new Accounting Year you set up contains an empty chart of Accounts, you will instead be shown to the first of a set of Chart of Accounts screens. Enter the information for each account and account type, and press the appropriate buttons to advance through the screens until finished. You might also be brought to a screen to set up Beginning Balances.
View Accounting Year Information
Choose View Accounting Year Information to open this screen.
- Each line contains the Start Date and End Date of an Accounting Year set up in the Accounting Module.
- A checkmark in the Closed box indicates that the year has been closed.
- Any name in the Closed By box indicates the login name of software Users that closed the year (if closed).
- A checkmark in the Beg Balances Finalized box indicates that the Beginning Balances were finalized.
- The login name of the software user that finalized the Beginning Balances is then shown in the Beg. Bal Finalized By box.
Update beginning balances from prior Accounting Year ending balances
- Choose Update Beginning Balances from Prior Accounting Year end balances.
- A message will prompt you to answer the question:
"Are you sure you want to update balances for 20XX [current Accounting Year] from 20XX [previous Accounting Year]?" - Choose Yes to continue or No to cancel.
Note:
If you are using the software for the first time, you will need to manually enter your Beginning Balances.
Re-copy Chart of Accounts from prior Accounting Year
If the current Accounting Year does not contain any entered Transactions, you can click the button to Delete [the current Accounting Year] and re-copy from Accounting Year [prior to the current one].
- Choose Re-copy Chart of Accounts from prior Accounting Year to open this screen.
- A message will prompt you to answer the question:
"Are you sure you want to replace the current Chart of Accounts for [the current Accounting Year] with the prior year Chart of Accounts [prior Accounting Year dates]?" - Answer the question by clicking Yes or No.
- Another message will ask you if you would like to copy Budgets and Budget Projection from the prior year.
- Answer the question by clicking Yes or No, and the process will complete.
- Once transactions are entered in the current Accounting Year, you can only click the option to Update [the current Accounting Year] account details from [the previous Accounting Year].
- A message will prompt you to answer the question:
"Are you sure you want to replace the Account details for [the current Accounting Year] with the Account details from [the previous Accounting Year]?" - Answer the question by clicking Yes or No.
Close Accounting Year
Choose Close Accounting Year (prevents further changes to Accounting Year) to open this screen.
- Click the dropdown box and Select the Accounting Year to Close.
- A message will prompt you that:
"You will not be able to add or change accounts, budgets, or transactions to this year after it is closed. Are you sure you wish to close Accounting Year [selected from the dropdown box]?" - Click Yes to close the year, or No to cancel.
Once you have clicked Yes to the message, the currently accessed Accounting Year will be considered Closed. In the Closed year, only the following Accounting Module features will be available for you to use:
- Search for, view, print, export, and email accounts, transactions, budget, and balance information. All features found in the Reports and Export menu will be available for you to use.
- Match Accounts
- Accounting Settings found in the Special Functions menu
In addition, only the Manage Years features used to Change to Another existing Accounting Year, Setup New Accounting Year, and View Accounting Year Information will be accessible in the Closed year. All other Accounting Module features while in the Closed year will be disabled until you Change to Another existing Accounting Year option to access a different year that is not Closed.
Convert to a Non-Calendar or Calendar Accounting Year
When you set up the Accounting Module, you are asked to enter a starting month for your fiscal or Accounting Year. At some point in time, your Church might decide to switch from operating on a Calendar Year (January — December) to a Non-Calendar Year (fiscal), or vice-versa.
Convert to a Non-Calendar Accounting Year
Note the difference:
If the Current Accounting Year is set to a date range other than one that runs from January through December, you are already using a non-calendar year. See instead Convert to a Calendar Accounting Year.
Click Convert to a Non-Calendar Accounting Year, and a message will prompt you to understand that "a backup should be made before you convert to a non-calendar Accounting Year". Click OK to the message, and another message will prompt you to understand that "while you have this screen open you will have exclusive access. No one else will be able to make changes to accounts or enter transactions while you are in this screen." Click the OK button to open the screen.
Here are some things to consider before changing from a Calendar to a Fiscal Year in Church Windows Accounting:
- Most of our customers who make this change call us back before the next year wanting to change back to a calendar year.
- From an accounting standpoint, December is one of the best months for Churches. Depending on the month, you could be ending your yearly reports on a less than encouraging note.
- Potential for miscommunications and conflicts when one person is thinking in terms of calendar year, while someone else is thinking in terms of fiscal year.
Suggestion: Many of the Churches that operate on a calendar year open their next year early (between June to December) and have their budget done months before the year-end, instead of waiting for the end-of-the-year crunch.
Click the dropdown box to select your New Start Date. After selecting a month, you will be notified that "the following years will be created" by the message that will appear beneath the box you clicked.
Verify that you have selected the desired date and click OK. You will be prompted to answer the question "Are you sure you want to convert to a non-calendar Accounting Year?" Click Yes to complete the conversion, or No to refrain from going any further. When you complete the conversion, the new Current Accounting Year based on the New Start Date you selected will appear above the Quick Access Buttons of the Accounting Module.
Convert to a Calendar Accounting Year
Note the difference:
If the Current Accounting Year is set to a date range that runs from January through December, you are already using a calendar year. See instead Convert to a Non-Calendar Accounting Year.
Choose Convert to a Calendar Accounting Year, and a message will prompt you to understand that "a backup should be made before you convert to a calendar Accounting Year". Click OK to the message, and another message will prompt you to understand that "while you have this screen open you will have exclusive access. No one else will be able to make changes to accounts or enter transactions while you are in this screen." Click the OK button to open the screen.
The January date that will begin the Accounting Year after you perform the conversion will show in the New Start Date box. Notice the dates shown beneath where the screen indicates "The following years will be created:", as those will be the new years that will be set up after you convert. Click OK to begin the conversion.
You will be prompted to answer the question "Are you sure you want to convert to a calendar Accounting Year?" Click Yes to complete the conversion, or No to refrain from going any further. When you complete the conversion, the new Current Accounting Year based on the January-December time period will show on the Portal of the Accounting Module.
Delete Unused Accounts
This option brings up a window with a list of all accounts in the current year that do not have any activity. At the top is an explanation of the criteria for deleting these accounts:

You will be able to put a check in the "Delete?" column on the right of any account you want to delete. Then click on the Delete Selected Accounts button at the bottom. Deleting an account in a year that it has no activity will not delete it in any past years that it DID have activity, all history will be kept.
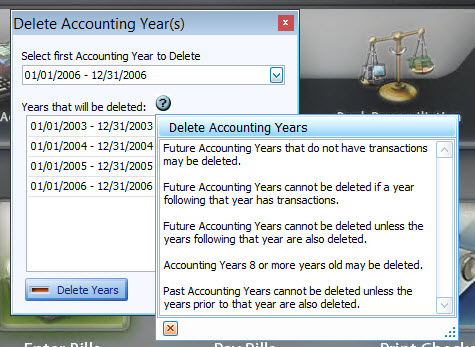
Delete Accounting Years
This option allows you to delete certain old or new Accounting Years as long as they meet a certain criteria. If no existing Accounting Years meet the criteria, it will simply tell you that there are no years available to be deleted. The criteria can be seen by clicking on the blue question mark, and are as follows: